Monday, December 21, 2015
Blended Learning
So what is blended learning?
Stacy describes the blended learning model as more than just integrating technology into the classroom. With my Ed Tech course our classroom was online. We met one day a week for the first three weeks, and those days acted as a tutorial for the course where we were able to ask questions face-to-face. The majority of the learning was done online and I really enjoyed that aspect. As this was an introductory course to technology in education my teacher, Jeremy Brueck (@brueckj23), had what he called an innovation lab that met once a week on the same day our class used to meet where his students could come in and ask questions they might have. Because this was my first online course, I found this to be a really good saftey net. I feel that this course was an excellent example of the enriched virtual model of blended learning. If you are curious about the different blended learning models, below is the blended learning model Stacy used in her presentation.

To have a class be truely blended, it must be on the continuiuum of direct instruction and online learning and incorporate at least one of the different learning models.
- The Rotation model contains four different rotation models. The station rotation model is very similar to the stations you experianced in elementary school. It typically has three stations; small group teacher lead instruction; computer based work; and peer colaborative group work.
- The lab rotation model is similar to going to the distance learing lab, however it occurs on a regular basis, possibly a few days a week. But the main idea is that students leave the tradional classroom to learn in a different environment.
- The flipped classroom model works in such a way that the instructional video lecture is watched at home and the practice work that would be traditionally considered homework would be completed in school with the help of the teacher.
- And in the individual rotation model each student decides based on their understanding of the material when they move on to the next station.
The other three models move closer to online learning.
- In the Flex model the student gets a choice in what courses they take and is essentially an online course in a structured environment.
- The Self Blended model is when a student takes more control of their education by taking outside courses, usually in an area of interest, that are not required for graduation.
- And the Enriched Virtual model is closely related to online schooling.
Blended learning doesn't have to be all or nothing, and doesn't have to fit into just one definition. How blended you make a course is based upon the strenght of the teacher, the culture of the community and the school, and the content area. But over all blende learning is personal to each teacher and class. What makes a blended learning environment different than a technology rich classroom is how you incorporate collected data from the online learning into your teaching and adjust your lesson plans accordingly.
Blending can be broken down into the below levels and your class can be blended on a sliding scale for each level and changed from lesson to lesson.

The International Association for K-12 Online Learning, iNACOL, has created a teacher compentency framework for blended learning which you can download here. This will give you the mindsets, qualities, adaptive skills, and technical skills they believe to be most important for teacher who want to make their classroom a blended learning environment. Below is a quick break down of this framework.
- Mindsets- core values or beliefs that guide thinking, behaviors, and actions that align with goals of educational change and mission.
- These mindsets are: new vision for teaching and learning; orientation towards change and improvement.
- Qualities- personal characteristics and patterns of behavior that help an educator make the transition to new ways of teaching and learning, through coaching, encouraging, and reinforcing.
- These qualities are: grit; transparency; collaboration.
- Adaptive Skills- generalizable skills that apply across roles and content areas. These skills include things like collaboration and problem solving. Adaptive skills help individuals tackle new tasks or navigate unfamiliar situations. These skills are complex, but can be mastered through modeling, coaching, and reflective practice.
- These adaptive skills are: reflection; continuous improvement and innovation; communication.
- Technical Skills- include the ability to use data to inform and drive effective instructional strategies while creating an environment that meets the needs of learners in both the face-to-face and online environmnets. Teachers are also able to demonstrate the techincal troubleshooting competencies in order to support students in the blended encironment.
- These technical skills are: data practices; instructional strategies; management of blended learning experience; instructional tools.

Blended learing is about more than simply using technology in the classroom, its about using that technology to gather information, apply it, and radically improve students' learning environments.
Incorporating Technology in Productivity
There are many ways technology can help you become a more productive teacher, from help with keeping track of time, to prioritizing tasks, that are countless programs and apps available with the click of a button.
The article 5 TOOLS FOR INCREASING TEACHER PRODUCTIVITY talks about a few programs that help teachers increase productivity not only inside of the classroom, but outside the classroom as well. A few of my favorites are:
I definately see myself using the programs created by google in my classroom because they are compatible with so many platforms and it is a program the majorit of kids are familiar with. But there are other productivity tools outside of Google that teachers may choose to use in their classrooms. This article from LifeHack goes over 10 of them, and below I have showcased a few that looked interesting.
After viewing this presentation made with Google Slides, I realized how using Google for Education in the classroom can make teaching so much easier. When I am in the classroom I hope to use the programs provided by Google to stay organized and be more flexible with how I teach and accept student work. I would love to use Google to help my student build their own porfolios. What productivity tools do you find most interesting? And how will you incorporate technology into your classroom?
The article 5 TOOLS FOR INCREASING TEACHER PRODUCTIVITY talks about a few programs that help teachers increase productivity not only inside of the classroom, but outside the classroom as well. A few of my favorites are:
- "RescueTime is an online time tracking and management program for any busy person who wants to get more done with their time."
- "The International Virtual Assistants Association can help you find a professional to complete tasks for you remotely."
- Wunderlist is an easy-to-use and free task manager that can help teachers and other professionals make and organize lists.
I definately see myself using the programs created by google in my classroom because they are compatible with so many platforms and it is a program the majorit of kids are familiar with. But there are other productivity tools outside of Google that teachers may choose to use in their classrooms. This article from LifeHack goes over 10 of them, and below I have showcased a few that looked interesting.
- Socrative is a great way for students to use their personal devices to engage course material by interacting with games and activities set up by the instructor.
- Remind101 is a great tool to use to send out text reminders to students and parents so they get a quick instantanious update.
- Google Forms. This one really stood out to me, and of course, its a Google program so it would be compatible with Google for Education. Its called Google Forms and looks like a great way to take formative assessments with your students. Google Forms can also be used for students to self grad and group grade.The below video is a quick tutorial on how this program works.
After viewing this presentation made with Google Slides, I realized how using Google for Education in the classroom can make teaching so much easier. When I am in the classroom I hope to use the programs provided by Google to stay organized and be more flexible with how I teach and accept student work. I would love to use Google to help my student build their own porfolios. What productivity tools do you find most interesting? And how will you incorporate technology into your classroom?
Digital Citizenship and Student Legacy
If you are curious what digital citizenship is, how it improves digital literacy, and the importance of digital ethics please watch the video below.
Digital citizenship is everything about you that people can see online. Teachers' digital resume is very important for their future career. Creating and maintaining a digital resume is how you leave a legacy online. Garth Holman teaches a 7th grade social studies class and is very good at incorporating TPACK in his classroom and stresses the importance of digital citizenship to his students. You can check out his student made text book for the class here.
Garth said the first most important thing is to build is a trusting relationship with your students when trying to foster digital citizenship. How will you inspire your students to become an involved digital citizen and what digital foot prints will they leave and follow?
In the terms and conditions of Facebook, Instagram, and Twitter, it stipulates that by agreeing to use their program you forfeit ownership to what you post. This is one of the first things Garth teaches his class. Just like this, students might not realize that they have already started to leave digital foot prints throughout their life, even before they were even born. The below video shows the never ending, ever growing cycle of the digital dossier.
When something is posted on the Internet, it never really leaves. The Way Back Machine is a website that archives information on the web. It is important for students to know that everything on the web lasts forever, and will always be there if you know how to find it. Everything you leave behind is traceable and findable. Because of this it is vitally important to stress to our students that they need to think before they post. I found this video really stresses the importance of being cautious of what you share, especially when it concerns personal information. I feel that there should be less emphasis on sharing your personal life online and more emphasis on sharing your professional life online. By being professional online you are putting your best foot forward for the world to see, and sometimes we can over share from our personal lives, but if we share professionally we always have in the back of our heads who our audience will be. Some people can get swept up in the false sense of security in of supposed anonymity that posting online provides, and this can lead to issues when potential employers or colleges trace your digital foot prints. So it is important to stress to your students that they should always be thinking of who their audience will be.
You know you have an impact on your students when they take the material out into the world and apply it to real life. To encourage this Garth has his students make blogs about the course so that others can interact with them about what they are learning. Even though nearly 43% of kids have been bullied online, and 1 in 4 have been bullied more than once, Garth hasn't run into any issues with his students, and his students are able to maintain a professional atmosphere on their blogs. Anything positive you can leave on social media is a positive digital footprint. For students to leave legacy teachers should encourage students to leave behind positive beneficial work. Your digital foot print is your legacy. Although it can be hard sometimes to leave positive digital foot prints when the statistics are so high when it comes to online harassment. Below are the findings from one online harassment report by Pew Research Center.

The article Nine Themes of Digital Citizenship talks about how not everyone has access to current technology, how the digital economy is growing because of buying and selling online, the ability to instantly communicate with anyone, how digitally literate the current generation is, and a lot about using technology and the internet in a safe and respectful way. The digial divide and cyber bullying, in my opinion, will be the main issues that hold us back from growing as a society that is increasingly useing technology. For more on digital ettiquett, appropriate behaviour online, and use of technology in schools, check out the article Addressing Appropriate Technology Behavior.
So how will you encourage your students or children to be responsible digital citizens, leave a legacy of positive digital foot prints, and remind them that other people outside of their intended auidence will be able to see what they post? I hope the materials I referenced will help you decide and formulate a plan to stress the importance of being a digital citizen to your kids.
Digital citizenship is everything about you that people can see online. Teachers' digital resume is very important for their future career. Creating and maintaining a digital resume is how you leave a legacy online. Garth Holman teaches a 7th grade social studies class and is very good at incorporating TPACK in his classroom and stresses the importance of digital citizenship to his students. You can check out his student made text book for the class here.
Garth said the first most important thing is to build is a trusting relationship with your students when trying to foster digital citizenship. How will you inspire your students to become an involved digital citizen and what digital foot prints will they leave and follow?
In the terms and conditions of Facebook, Instagram, and Twitter, it stipulates that by agreeing to use their program you forfeit ownership to what you post. This is one of the first things Garth teaches his class. Just like this, students might not realize that they have already started to leave digital foot prints throughout their life, even before they were even born. The below video shows the never ending, ever growing cycle of the digital dossier.
When something is posted on the Internet, it never really leaves. The Way Back Machine is a website that archives information on the web. It is important for students to know that everything on the web lasts forever, and will always be there if you know how to find it. Everything you leave behind is traceable and findable. Because of this it is vitally important to stress to our students that they need to think before they post. I found this video really stresses the importance of being cautious of what you share, especially when it concerns personal information. I feel that there should be less emphasis on sharing your personal life online and more emphasis on sharing your professional life online. By being professional online you are putting your best foot forward for the world to see, and sometimes we can over share from our personal lives, but if we share professionally we always have in the back of our heads who our audience will be. Some people can get swept up in the false sense of security in of supposed anonymity that posting online provides, and this can lead to issues when potential employers or colleges trace your digital foot prints. So it is important to stress to your students that they should always be thinking of who their audience will be.
You know you have an impact on your students when they take the material out into the world and apply it to real life. To encourage this Garth has his students make blogs about the course so that others can interact with them about what they are learning. Even though nearly 43% of kids have been bullied online, and 1 in 4 have been bullied more than once, Garth hasn't run into any issues with his students, and his students are able to maintain a professional atmosphere on their blogs. Anything positive you can leave on social media is a positive digital footprint. For students to leave legacy teachers should encourage students to leave behind positive beneficial work. Your digital foot print is your legacy. Although it can be hard sometimes to leave positive digital foot prints when the statistics are so high when it comes to online harassment. Below are the findings from one online harassment report by Pew Research Center.
The article Nine Themes of Digital Citizenship talks about how not everyone has access to current technology, how the digital economy is growing because of buying and selling online, the ability to instantly communicate with anyone, how digitally literate the current generation is, and a lot about using technology and the internet in a safe and respectful way. The digial divide and cyber bullying, in my opinion, will be the main issues that hold us back from growing as a society that is increasingly useing technology. For more on digital ettiquett, appropriate behaviour online, and use of technology in schools, check out the article Addressing Appropriate Technology Behavior.
So how will you encourage your students or children to be responsible digital citizens, leave a legacy of positive digital foot prints, and remind them that other people outside of their intended auidence will be able to see what they post? I hope the materials I referenced will help you decide and formulate a plan to stress the importance of being a digital citizen to your kids.
Thursday, December 17, 2015
Flash Suit Progress 4

One of the last steps in making the pattern was to trace the pieces. To do this I took all the pieces apart on only the right side, leaving the left side sewn together for orientation purposes. I used white tissue paper that you would use in a gift bag to trace my pattern on.
As I was progressing towards this step, I was curious to see if anyone else had done similar steps. Here is an excerpt from this article that I found helpful:
- Cut your fitting pattern from muslin or another light weight, light colored even-weave fabric. You don’t want to use anything stiff or heavy because it won’t fit snugly and smoothly over your body. You also don’t want to use a knit fabric, because the stretch will distort the final pattern. The natural muslin or light color allows you to see your corrections – you WILL be marking on this muslin, so don’t use a “nice” fabric!
- Note the wide seam allowances and all markings on the fitting pattern – these must be transferred to your muslin. Tracing paper and a tracing wheel work well for this, but you can also lay the pattern UNDER the fabric and use a fine-tip marker and a ruler to transfer the markings. The muslin will not be used for anything other than fitting so don’t worry about making permanent markings on the fabric. Mark the grainlines, too so you will be able to see if the garment hangs properly when it’s being fit.
To create the grain lines I looked at the orientation of each piece that was still sewn together on the left side and created the grain lines based on the vertical orientation of each piece. I made sure to mark the grain lines in such a way that the hexagon pattern on the final fabric are, for the most part, orientated vertically up the body of the suit.


When the final version of the suit is sewn together all seams will have bias tape cording sewn between them. Bias tape cording is this:

And when is is sewn into the seams it looks like the light blue trim in this picture:
 The bias tape cording would be used to create the embellishment of the yellow/gold roping seen following the seams of the suit in the model. It would take considerably more time, but for those wanting to have the roping light up, you could make your own bias tape out of yellow tool (mesh fabric) and use EL Wire as the cording that runs through the tape. As I have not gotten to this step yet I am unsure how much bias tape cording you would need to cover all of the seams of the suit.
Now that the pattern is complete, I will be able to shop for fabric. However looking into fabrics previously, I haven't been able to find one that both Adam and I agree with, so I will probably end up making my own design and having it printed by either Fabric On Demand or SpoonFlower.
If I am ever able to, I would like to try and grade my pattern, or make it available in different sizes. I found this article that talks a little bit about pattern grading and sizing, but I fear that my pattern is far too complex to try that with because as the article says,
"Pattern grading is fairly complex. It's best to avoid it unless it's necessary. "
But, here is the link to the article for those who might be interested.
For those of you who might need help understanding a pattern, I found this article to be very helpful.
Over all, tracing the pattern was the easy part, it was just time consuming because of the precision it required. By the end of this project I have probably spent right around 50 hours total, give or take a few hours. I found it best to try and devote multiple hours a day to different parts to see the most progress by the end of each day.
The pattern for this suit was perfected on Adam. Adam is a size 29x31 pant size, he is about 130 pounds, and is 5 feet 5 inches tall.
The next step for me will be making and testing helmet designs and figuring out how to extend the collar of the suit to the jaw line. The most helpful video I have found is embedded below. The video is from my Youtube Playlist: Flash Costume, so you can also see the other videos on ideas I have.
The next step for me will be making and testing helmet designs and figuring out how to extend the collar of the suit to the jaw line. The most helpful video I have found is embedded below. The video is from my Youtube Playlist: Flash Costume, so you can also see the other videos on ideas I have.
Thanks for following my progress, and I hope to share more with you soon!


Wednesday, December 16, 2015
Flash Suit Progress 3

After finishing the bottom half of the suit, I began working on the top half. I started by darting the shoulder, and then sewing all the pieces together that connected to the shoulder, alternating right and left side for each piece, and worked my way down each arm.
There really wasn't any difficult curves to try and sew like in the pants because the majority of the top was cut with straight or gently curved lines.
Originally I had made elbow caps, but I ran into the same issue as with the knee, and they did not fit right, so I omitted them. Until I find a better solution I will be making the elbow patches out of a super stretchy fabric, possibly spandex or Lycra.
There is a seam that runs down the chest of the suit that was pinned closed for the pictures, but will close in the final version with a zipper.
Now the biggest issue was during the stretch test. I had Adam stretch his legs, bend down, lift his arms, and push his arms forward. On the forward push the seam that ran up the back burst, and so I marked where I needed to add more fabric.
I was at a stand still though until I figured out how to do that without letting the back bunch up and wrinkle. I had first though about adding a cat's eye of stretch fabric, but I soon realized that it would add too much length to the edges and I would be left with a lot of over hang. Adam then suggested to try and make a hidden pleat, like in the back of some suit jackets.
I pondered on how to do this for a while, and tried to sketch out my ideas.
In the 6 inch tall hole that runs between the shoulder blades, I added 7 1/4 inches tall by 1 5/8 inches wide to the right half of the pattern perfectly centered in that hole. The seam that runs vertical will be sewn to leave a 6 inch hole, and the excess fabric will be sewn with a 5/8 inch seam allowance. The two vertical seams will overlap on either end by 5/8 of an inch, and there would be a small hole you could stick your finger through at each end. The excess fabric would be folded inward and ironed flat, the creases running straight and even. After ironing the bubble of material on the inside would lay 1 inch wide.
The last adjustment I made was to add some small darts near the elbow hole to bring the edges in.
To finish I labeled all of the major junctions with capitol letters of the alphabet to make sure I knew what went where when it came time to rip the seams.
Flash Suit Progress 2

My first step on this part of the project was to lay out the right side duck tape pieces on the floor to see how the pieces fit together. This step could of been omitted if I would of labeled where all of the corners met. But by doing this it gave me a visual as to how the puzzle fit together.
My next step was to sew all the darts I had made. The darts were slits I cut into the domed areas of the duck taped pieces to make them lay flat, such as the knee cap, back of calf, and shoulder.
I then began sewing the right side together, starting with the two pieces that arch over the hip seam, and then did the same thing mirrored on the left side. From there I worked my way down each leg, alternating right to left.
The hardest part was sewing the sharp curves that, in the picture, look like they fit together, but when the outsides are pressed together, the curves fit opposite of each other. Like laying this edge ( with this edge ) and forcing the opposite direction curves to be sewn together at the edge. The best example I could find is this image:

Where you would take the polka dot sides and press them together, having the white on the back facing outwards, and having to pin the curved edges, that are now going in opposite directions, together and sew them so the two sides fit together like puzzle pieces when it is opened and only polka dots are on top and only white is on the bottom.
This can be seen the best in the image of the right leg, the S that curves from mid calf to over the top of the knee. I had to pin the pieces together with no more than 1/4 inch of space between each pin. Sewing this particular spot took extra time because the fabric kept wanting to fold over its self under the sewing machine foot and make a small pleat that showed up as a permanent wrinkle on the right side, or outside, of the fabric. Because of this it took many attempts of pinning and sewing to get rid of these mini pleats.
After both the legs were sewn, I sewed the pieces that look like a bikini bottom together, and then pinned the legs to the leg holes, matching the hip seams on either side. I pinned one leg at a time, starting at the hip seams, and alternated pins on either side until they met in the middle at the the inside of the thigh. I did the same thing to the other side.
I was so excited to have the bottom done that I had Adam try the 'pants' on so that I could take a few pictures. The next step will be sewing the 'jacket' and sewing the top and bottom together at the waist.
Monday, November 9, 2015
Assessments of Learning
One of the greatest tools a teacher can utilize is the formative assessment. Formative assessments are most effective when they are part of a cycle called the learning cycle. A colleague of my professor, Jeremy Brueck, has created a very informative graphic to help students better understand what the learning cycle is. The graphic can be found here and I definitely recommend taking a look at it.
Formative assessments occur during the learning process and are designed to give feedback, where their counter part summative assessments occur post learning. In the quick video below by Rick Wormeli, he very passionately describes the importance of formative assessments and how they are different from summative assessments.
One of the greatest results of formative assessments is the feed back students receive and how that helps them grow. In this link there is a 3 minute video that shows an example of how the learning cycle paired with formative assessments helps students in Mr. Kelsey's music class grow.
Formative instructional practices, or FIP, as it is referred to in this video help Beechwood Elementary School's teacher Mrs. Susie create a focus for her class and allow students to receive help based on what level they are at.
The colleague I mentioned is Scott Kinkoph, and he utilized a lot of fantastic formative assessment tools in this weeks online lecture. Below is the video, its about 30 minutes, so if it is too lengthy for you to watch I will go over the tools he uses and a few more recommended by my professor later on.
Here is the list of different digital formative assessment tools:
So how will you choose to asses your students? By observing them, by using one of these tools, or even by old fashioned pencil and paper. This is something to think about, about how you will gather vital data on each of your students to use to better their learning experience.
Saturday, October 31, 2015
Flash Suit Progress 1

Adam and I started this project by first getting a pair of skinny jeans and tight fitting hoodie to be taped over. As you can see we taped the legs first and then the chest. Adam (the one in all the duck tape) got very hot very quick so he often unzipped the hoodie to cool down. I highly recommend leaving the zipper exposed for this very reason.
Next for drawing on the lines of the suit pattern we used a sharpie and referenced these to 3D models of the Flash. The models we used are linked below.
Version 1
Version 2
For this design the 3D rotatable model was invaluable and I highly recommend to anyone making a costume from scratch to try and find one for their character. Also to easily erase your sharpie mistakes simply rub a cotton ball damp with 100% acetone over the line and start again.
We cut the legs off of him next, making sure to label each piece, The torso was more confusing so I layed the pieces out flat like a puzzle to get an idea of how they connect. I labeled the corresponding intersections of the torso pieces with letters to more easily match the corners later.
I had a large amount of test fabric to work with that my grandma got me from a garage sale, but I would say for test fabric you wouldn't need more than two and a half yards. I went through the duck tape pieces and compared the left side pieces to the right side pieces and picked the right side to work with. I placed the right side pieces out on the folded in half fabric, making sure to leave enough space between them to add a seam allowance. The fabric is folded in half so that when I cut out the pieces I get two identical, one for the left side and one for the right.
Typically a seam allowance is 5/8 of an inch, so I traced each piece and then with a ruler went around the edges of all the pieces and added a 5/8" border, pinned the two sides of fabric together inside each piece, and cut the pieces out.
That is all the progress I have so far, but the next step will be sewing the test suit together! Stay tuned for my next post!
Educational Tools: Photos
For this educational tool review I have decided to review Pixlr Express. The very first thing I did was click on collage which brought me to this screen.

The next thing I clicked on was the layout a little bit more complex than I liked, but I had already added some photos. But! There was no issue switching to a different layout because I could simply drag and drop my photos into the new spots I wanted them in.
When I uploaded a photo that didn't perfectly align with the square I was able to drag it into the position I liked and easily switch the order with a different photo. All in all adding and adjusting photos was very simple, the plus button allowing you to add photos from your computer, spacing allowing you to change the amount of space between the photos, roundness allowing you to round the corners of your photos, and proportions allowing you to change the picture clusted from a perfect square into different rectangles. The color option allows you to choose a custom color that will be used as a border around your images.
When you click finished it brings you to another editing screen where you can add a wide variety of photo shopping effects, lighting and overlay effects, borders, stickers, and text. Finally whe you are finished adding your effects, hit save, and Pixlr will give you the option to name your file and choose the quality. And as simple as that your image collage is saved to your computer.

And there it is, my finished collage. Over all this site was very easy to use, left you with a great end result, had no major unforseen issues along the way, and was pretty fun. I would easily give this program 5/5 stars.
Learning Spaces
There are many different types of learning spaces, but some are more catered to developing student engagement than others. An open flexible floor plan allows students to taper the classroom to their learning needs and find spaces that fit their individual learning style. Below is a video that show cases a flexible learning environment.
There are so many more avenues that can be followed when exploring different learning spaces. One such school has pushed innovative learning to the extreme and modeled their entire school around a design that whole heartily has the students in mind.
Out of both of these rather intimidating approaches there was a third one that seems like a wonderful place for schools to start.
The University of Akron is really taking a step forward in trying to develope informal learning spaces and I can see many elements on campus that reflect the points brought up in this article. One of the things I have noticed but never seen utulized is a secluded outdoor theatre of sorts where the grass is carved out into steps with a place for the professor to stand at the bottom of the hill. Its in a beautiful spot and I always invisioned it as a great place for a socratic seminar but I have never seen it used. The University of Akron seems stuck half way between an innovative learning space, and a the traditional factory modeled class room. I can take a class that is very personalized and tapered to my learning needs, but there are still classes available that I can take that have any where from 300 to 500 kids in them. I mean really? How many of those kids in that class room can actually succeed, and how many of those kids does the instructor actually remember their name!
So what will you do to make your learning enviroment unique? You might think back to the way a favorite teacher taught, or a room you really enjoyed working in, or even the way you sit to study and work. Some inspirational photos for ideas for learning spaces can be found here. Have fun out there and don't be afraid to get creative.
Tuesday, October 27, 2015
Educational Tools: Video Editing
VivaVideo
For this cool tool review I have chosen to check out VivaVideo. All the features are completely free, however you are only able to export up to a five minute long video. I downloaded this app on my Samsung Galaxy Note 3.So I took some screen shots of most of the menus and used the collage feature to make a video about VivaVideo, here it is below!
In the main menu I clicked the slide show button and it gave me the option to choose photos from all the folders on my phone. I went to my screen shot folder and selected the images I just took. Now its important to make a note that the images appear in a tray at the bottom where they can be removed or re-ordered. If you re-order the images in this tray to the order you want them to appear in your video things will be a lot easier down the road.
After you click done you will be brought to the editing screen where you are first prompted to pick out a theme for your video. Themes are pre-set music and transitions for your video. I played it to see what it was like and realized that the amount of time my images appear on the screen was too short for me to give a description about so I then went to the Duration icon and made my images appear for ten seconds each.
I then went to the Edit icon and in the sub menu I selected Sound. Here it was really easy to record my voice and give a description of each image. Just drag your video stream to where you wish to begin adding sound and then hold down the record button, talk, and then let go when you are finished. After recording you can then adjust the volume level of your recorded sound.
My audio was still pretty quiet compared to the background music so next in the sub menu of Edit I went to Mulit Music and adjusted the volume level of the background music. After re watching my video to see the changes I made I realized I didn't like one of the slide transitions, so in the sub menu of Edit I went to Transition. In Transition you can select the points between images and choose a different effect, I went with the same effect but changed the direction of the transition by tapping the style repeatedly.
After this minor tweaking I was happy with what I created and was easily able to export the video to many different places. I emailed it to myself, downloaded it, and uploaded it to this post. Over all I am very satisfied with this app and I am planning on using it in the future to make tutorials. I would give this app 5/5 stars, definitely worth the time.
Injustice Flash Suit Pattern

For my Educational Technology course at the University of Akron our final project is to teach ourselves something new. This project will span about a third of the semester and is estimated to take about 50 hours. I love to cosplay and sew, so I thought I would try and tackle a project that I have wanted to do for a long time now.
Goals
Over the course of my major project my goal is to teach
myself how to make a pattern from scratch. I have basic sewing experience, but
I am not very good at reading or altering patterns. I hope to learn how to
better read patterns, take proper body measurements, and craft an original
pattern by altering existing patterns and taking apart prefabricated clothes. I
also hope to learn more about how to label pattern pieces in such a way that
they are applied to the fabric to receive maximum stretch. To complete my
project I hope to make a direction sheet to be used when putting the pattern
together.
Resources and Learning Materials
The resources I plan on referencing to complete my project
are videos, reference images, chat threads on public forms from other costume
designers, craft store employees, blog posts, friends who sew, and existing
patterns. I have already found some of these resources, and will make note of them in future blog posts.
The materials I will be using consist of, but are not
limited to, sketch paper, pencils, pens, sharpies, fabric markers, straight
edges, duck tape, tissue paper, scissors, scrap fabric, existing clothes, iron, ironing
board, measuring tape, and sewing notions.
Documentation of Progress
I will try and make my learning transparent to others by
posting a lot of images of my progress, posting my thought processes, and
posting all of my references. I will post my progress along the way on my
Blogger, and possibly compile all of my knowledge at the end into a wikiHow
article. I will not tweet each interesting thing I find until I have compiled
it neatly on a blog post, then I will tweet my blog posts under the hashtags
#UAEdTech, #DCcomics, #Flash, and #Cosplay. My blog posts will be tagged under
the major project tag.
Planned Timeline
Wednesday I have designated as my major project day, there
is nothing else scheduled for me on that day so I am free to spend as much time
as I can on my project. On Tuesday, Thursday, and Friday I will also work on my
major project, but only after the homework for my other classes is finished. If everything goes
smoothly I hope it will take close to 100 hours to complete my project.
My work weeks will begin on each Wednesday and go until Tuesday.
- Week 1- Research, take measurements, design, and gather supplies.
- Week 2- Cut pieces, add to paper, and add seam allowances.
- Week 3- Test pattern and make changes.
- Week 4- Test pattern, make changes, and complete pattern.
- Week 5- Start direction sheet.
- Week 6- Finalize direction sheet and pattern.
- Week 7- Summary and Pre/Post assessment.
Possible Challenges
Possible challenges I may face during this project are
designing a piece and having it not fit when I try and sew it back together,
making my pattern pieces too small or too large, and possibly running out of
time to complete this project if I run into any major unforeseen issues.
Critical Friend
The critical friend I have chosen is my boyfriend Adam. He
currently lives with me and he is the one I am designing the pattern for. Not
only his extensive knowledge of the super hero universe and artistic critical
thinking skills, but also his emotional support, will be valuable tools for me
as I attempt to complete my major project.
Conclusion
The above is the break down for hopefully Part 1 of this project, this is for school so I had to be realistic about what I could get done before the end of the semester. The next possible parts of this project to get the costume finished could be:
Part 2- Using the Pattern
Part 3- Making the Helmet
Part 4- EL Wire and EL Tape
Part 5- Chest and Shoulder Armor
Part 6- Gauntlets
Part 7- Schynbald and Sabaton
Part 8- Putting It All Together
Part 9- Showing It Off
Sunday, October 25, 2015
Books of the Future
Our weekly topic video is a recorded lecture by Jon Smith, @theipodteacher on Twitter. The lecture is recorded with a program called Presentain. Presentain is an interactive presentation tool that also records the speaker and creates a file that can be uploaded like the above video. The below video gives a good introduction to how to use Presentain.
While Presentain is free, you can choose to upgrade with a monthly subscription to get more features.

Jon begins his presentation by talking about the struggle to get his students to begin to enjoy writing, and after turning down all of his daily writing prompt ideas he realized that all the work kids do in school is only for an audience of one, the teacher. The other issue he discovered is that for the kids they have no sense of purpose in their work. And the final issue he discovered is that there was no way for kids to leave a legacy for future students to see after they are out of high school. This topic all begins at seven minutes into the video.
iBooks Author is a free software Jon discovered that allows you write and publish your own eBook. His kids ended up writing and publishing a book called The Two Kids and Desert Town. Below is a reflection video where the authors of The Two Kids and Desert Town share their thoughts. This article is where I found that video and it also contains a short review of the students' book.
They also wrote 5th Grade: Reflections on Our Year, and their own version of the 6th grade textbook Math Our Way. For more books that students wrote at his next school fast forward the weekly topic video to 34 minutes or visit his website.
Most of the books he created can only be viewed on a Mac, however Jon recommends ePubBub to publish books that can be read on any device that can connect to the internet. The majority of Jon's students' books were created with the Book Creator version for the iPad. Book Creator is also available for Android now as well. For a more indepth tutorial for iPad users check out this informative slide show.
The way I see ebooks impacting the writing process is by encouraging students to read more and becoming a fun and creative outlet that will get students excited about writing. If we begin introducing ebooks to young students it will increase reading levels, vocabulary, and writing skills over time. Ebooks are more interactive that paper books, containing videos, quizzes, and passages that have the option to be read aloud to the reader. These features make ebooks more interactive for students and foster growth through independent learning. I have found that by reading more you become a better writer, but ebooks do more for students that just provide a fun way to read. With the ingenuity of teachers today and the integrative technology, students are now able to create their own ebooks, and just as Jon found out kids get pretty excited to be published authors.
I see a virtually paperless class room in the future as curriculum moves away from physical textbooks to digital textbooks that can be accessed anywhere and cost significantly less than their counter parts. I believe currently there is an inflation on digital textbook costs that will hopefully decrease as cheaper avenues become available. There is also the issue of the temporary digital copy where after a certain amount of time you can no longer access the text, therefore keeping the physical textbook relevant. When students create ebooks with the guidance of a teacher the information is trustworthy and relevant to the content being learned.
When student ebooks are used in the class room the information is tapered to the course, to common learning needs of students, and validates student work by providing an audience and legacy. I would be overjoyed to use student created ebooks in my future class room because I feel my students would engage more with the information because it was written by their peers. I am also very excited to try and make my own textbook. To make sure the most effective texts are used I would have the students vote on their favorite ebook and take a quiz over the information to see which book they learned the most from. I would also look into how many different learning styles each book caters to and pick the one that fulfilled the most. For more about incorporating ebooks into the class room check out this short article.
The major piece of information I took away from Jon's presentation was the quote at the end of the presentation.
"When children create for the world, they make it good. When children only create for their teacher, they make it good enough."
-Rushton Hurley
Sunday, October 18, 2015
Educational Tools: Infographics
So for this cool tool review I looked into all the different options I was presented with and looked at each one until I found the free one, the one that was completely free and didn't ask you to sign up for a plan. I feel that we as future teachers and current college students need to know what is out there that is available to virtually every one, not just those who can afford a membership. For my infographic tool I chose to go with piktochart.com and the reason I did is because it advertised its account as free, and I was skeptical, but when I clicked on it I was brought to this:


I have conveniently highlighted what I am referring to...
After creating my FREE account, I was brought to the introduction screen and a window popped up and recommended that I make my first infographic with one of their over 400 templates instead of starting with a blank template. They also directed me to some beginners' guide ebooks.
This is what first made me start to like this tool, lots of choices and even the ability to start with a blank slate.
This is a link to their ebook The Untapped Potential, this is a link to their ebook Create Your First Infographic in 15 Minutes, this is a link to their ebook Using Piktochart Like A Pro, and the last link is to their ebook Unleashing the Power of Your Creations.
All of these links appear in the introduction window. I would consider referencing the Create Your First Infographic in 15 Minutes, but I'd test to see how intuitive their interface is.
Per their recommendations I browsed through the templates until I found one that suited me.
As I browsed I found a sad truth, though they hid it very well. They too want you to upgrade to a paid membership to access all the template choices.

I continued exploring how to make an infographic using one of their free templates.
The site was actually really intuitive and for only having the free version I had A LOT of choices to make when customizing, it was actually really nice.
Here is my finished piece, I spent about an hour and a half on it, and I could see how you could spend even longer if you don't use a template.

Over all I would recommend this tool, and it would be a great reference for teachers and students.
I would give it 5/5 stars. While the membership fees had me worried the free version wouldn't be as great, I was actually quite surprised.
Copy Rights and Creative Commons
The responsibility as a teacher to understand and use images with copyright, public domain, and creative commons licenses is very important, especially when considering the consequences. Let's first talk about what copyright is.
What is a copyright?
Copyright is a Federal regulation that is part of the U.S. Constitution, found in Article 1 Section 8, which allows Congress to adopt both copyright laws and patent laws, encourage creators to continue to make new work and expand upon previous work by providing the possibility of financial gain, and finally Article 1 Section 8 requires that the rights eventually expire.
So as a copyright owner you can:
- Reproduce the work (make copies)
- Derive works based on the original
- Distribute the work
- Perform it publicly
- And broadcast the work publicly by means of digital transmission
For more information on copyright and to answer some questions you might have, please take a look at the U.S. Copyright Office FAQ page.
And once you create something it is automatically protected by copyright. but for extra measure you can register your creation with the U.S. Copyright Office. There is a fee, however, but you can take a look at this document for more information.
Copy right laws cover seven categories:
- Literary works
- Musical works
- Dramatic works
- Pantomimed and choreographed works
- Pictorial, graphics, and sculptural works
- Motion pictures and audiovisual works
- Sound recordings
According to A Teacher's Guide to Fair Use and Copyright by Cathy Newsome, "A copyrighted work may be used or copied under certain conditions:
- public domain -- work belonging to the public as a whole--government documents and works, works with an expired copyright or no existing protection, and works published over 75 years ago;
- permission -- prior approval for the proposed use by the copyright owner;
- legal exception -- use constitutes an exemption to copyright protection--parody, for example;
- or fair use -- use for educational purposes according to certain restrictions" (© 1997)
Newsome goes on to describe the four standards for determining fair use exemption which are the purpose of use, nature of the work, portion or extent of the material used, and the effect on marketability.
This is an interesting video which illustrates how one teacher at West Side Collaborative Middle School in New York City is incorporating fair use into the classroom.
This is an interesting video which illustrates how one teacher at West Side Collaborative Middle School in New York City is incorporating fair use into the classroom.
Public Domain
Copy right is not an issue when information belongs to public domain. Information and material belongs to public domain when the work is not covered by copyright law, the copyright is expired, is a government work, or the work is dedicated to the public domain.
Usually when something is not covered by copyright law it means that the overarching idea or concept cannot be copyrighted. If the copyright expires or the work was created before copyright laws existed then the work belongs to public domain. When a copyrighted work is enacted into law that work then becomes part of the public domain. And when a work is dedicated to the public domain it usually means the work holds a Creative Commons License.
Creative Commons
This video quickly describes what a creative commons license is:
As an artist I will definitely be looking into getting a Creative Commons License for my works, and this next video explains a little bit more about how that would work.
If you are interested in Creative Commons, check out their website for more information.
If you are interested in Creative Commons, check out their website for more information.
Digital Content in Education
When it comes to copyright law and teaching, teachers are under a moral obligation to practice integrity and trustworthiness when it comes to using copyrighted material. While there is a little bit more freedom for teachers and students alike when it comes to using copyrighted material for educational purposes, it is still vitally important that we educate not only ourselves, but also our students about how to safely, considerately, and legally incorporate copyrighted material into our education.
The video below is a good introduction for teachers when incorporating copyrighted work into their lessons:
The video below is a good introduction for teachers when incorporating copyrighted work into their lessons:
For a great example on teaching copyright laws to students and fellow educators, please take a look at Teachingcopyright.org.
Conspiracy Theory Time!
On a side note, keep an eye out for a future blog post I want to write surrounding the rumors that you forfeit some or all of your rights when you post work to DeviantArt whatever information you delete on Facebook you forfeit you rights to and becomes Facebook's intellectual property, how Twitter has claim to your tweets, and how Instagram could also partially own your photos.
If anyone has any cited information on this please feel free to share it with me.
Monday, October 12, 2015
Educational Tools: Concept Mapping
For my Educational Technology class at the University of Akron we are doing a review each week of a helpful or interesting educational tool. This week I have chosen to review the Cool Tool MindMeister.
Creating the account was simple and easy enough, however when I went to go back to the website this page popped up:

I am quite perturbed. I am not sure if I am only allowed to have 3 mind maps at a time or only my first 3 created are free. I was really hoping to find a program that I would be able to use through out school. This is something I wish they would of mentioned up front.
Well. I went to upload my own image to start my mind map, and I was prompted with the option to "upgrade" to be able to use that feature. I was however, able to use a URL to load a picture. The URL option was not fool proof, it only worked with one URL.
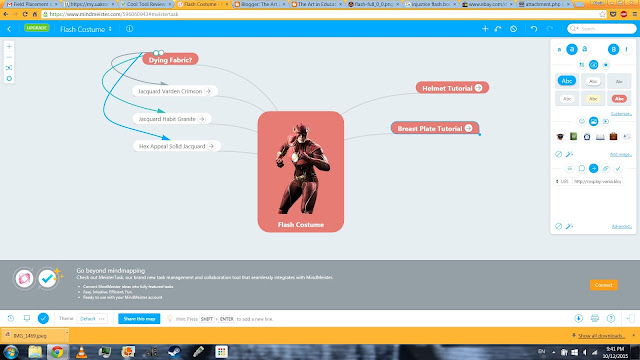
This is the mind map I was able to create, it is based on my final project idea. The tools were fairly easy to navigate and over all it was easy to make. The topics with an arrow next to them are hyperlinked. The tool bar on the side is how you edit all of the bubbles.
This wasn't my favorite tool to try and use, but it was interesting and got me out of my comfort zone. I would not recommend this application to anyone unless they desperately needed to create a mind map.
Friday, October 9, 2015
TPACK
So what is TPACK and how does it help introduce technology into the classroom?
TPACK stands for Technological, Pedagogical, and Content Knowledge. The "A" actually stands for And, and pedagogical knowledge is knowledge of the processes, practices, and methods of teaching and learning and how they works to benefit educational goals.
Educators use the TPACK model to show how the three areas overlap and are joined together in the middle to form what is referred to as the sweet spot. An educator is in the TPACK sweet spot when their pedagogical and content knowledge is being smoothly communicated through the use of technological tools.
Take a look at the quick video below for a visual representation of the TPACK model.
When introducing new tools into the classroom, a teacher cannot just blindly throw in technological components with out first considering how the use of that technology enhances the content being taught and how the technological supports interact with the teacher's pedagogical knowledge.
"TPACK also stand for the idea that what teachers know about effective teaching, their subject matter, and educational technology must be used together for teachers to be successful in their classroom supporting student learning." -Clare Kilbane
The above link will take you to the video this quote is from.
The main idea of TPACK is that a teacher's knowledge is engaging and accessible. No student wants to sit through an hour of monotonous lecture, but rather every student learns differently and should be able to access the teacher's knowledge in such a way that it holds their attention, they want to participate, and they are excited to engage with the information out side of class.
There are so many different kinds of technology that are constantly being fazed and new technology at the ready to replace the old, that it may seem overwhelming and quite a daunting task to keep up with it all. An article called A Teenager's View on Social Media that I referenced in my first blog post is very helpful reference when trying to be "hip" and keep up with the kids.
Some positive attributes of integrating technology in the classroom are teacher approaches are more student centered, students work together more, have a better understanding of content, and motivation is increased. With the wider availability of word processing programs, interactive self reading texts, and the research capabilities of the Internet students have better writing and composition skills, reading and comprehension skills, and enhanced problem solving and higher order thinking skills.
Well this sounds awesome, there are potential barriers that can arise when trying to introduce technology in the classroom. One of these barriers is something that I touched on in the above paragraphs is that teachers who grew up in a world where technology did not have a great importance or didn't have access to technology during their schooling tend to feel overwhelmed when approaching technological tools, or feel they have difficult connecting the pedagogical training and technological tools. The other issue that can appear is that teachers may lack the training to really incorporate technology in the classroom and that if teachers are trained the programs they use are out of date.
In my future classroom I will ask the students what programs they are comfortable using and try and incorporate them into my classroom and teach my self how to use the new technologies. I am probably very naive in this thinking, but being open and ready to learn I feel is the best approach to being a great teacher.
Sunday, October 4, 2015
Educational Tools: Word Clouds
For my Educational Technology class at the University of Akron we are doing a review each week of a helpful or interesting educational tool. This week I have chosen to review the Cool Tool Wordle.
When I think back to what I learned in this week's lesson, in the TPACK model this application would not be a very fluid way to integrate technology in to teaching methods or a very informational way of presenting content.
Below is the TPACK model I was shown during the lesson.

I would give this application 1/5 stars, and would not recommend it to teachers or students.
"Wordle is a toy for generating “word clouds” from text that you provide. The clouds give greater prominence to words that appear more frequently in the source text. You can tweak your clouds with different fonts, layouts, and color schemes. The images you create with Wordle are yours to use however you like. You can print them out, or save them to your own desktop to use as you wish."
This is the text that appears on Wordle's home screen and I found it to be a very concise summary. This is a new tool for me so before going to the website I actually had no idea what a word cloud was.
The very first thing I found when trying to create my first word cloud was that the Chrome web browser no longer supports NPAPI plugins because they are outdated and can cause security risks. NPAPI plugins are Silverlight, Java, and Unity, however Flash is a PPAPI plugin and is still compatible with Chrome.
I proceeded to open Wordle in Firefox, and I was successful in creating a word cloud but only after recieving many dialog boxes asking for different permissions.
At this point I would say Wordle is not worth the hassle, and if you were trying to have students use it for a project the issues would probably be far more involved. I feel that if I were a teacher asking students to use this I would waste valuable class time trouble shooting all the problems. I would only have students reference this as an optional resource, possibly giving a chance for bonus points if a word cloud is used. The probable issues that would be encountered and the fact that I find word clouds to not have much purpose makes this tool not worth the time.
Over all the website was easy to navigate, and the word cloud was easy to create. I used the text from a reflection paper I wrote in response to the F. A. T. City Workshop video I watched for my Intro to Exceptionalities course. This is the word cloud I created:

Okay. As I was trying to upload this image, I ran into the issue that the type of file the image is downloaded from Worlde as is not recognized by my computer. I was able to open the file but I had to choose the application I would use to open the file with. I chose windows multi media viewer. I was not able to upload the file to Blogger because the unknown file type was not recognized even though the website says it will be saved as a PNG, so I had to open the image and save a copy of it as a JPEG, and then I was able to upload it to this post.
While the steps on Worlde are fairly simple to follow, and students could definitely create their own digital media artifacts, what I went through makes me say that I would not try to use this in the classroom.The very first thing I found when trying to create my first word cloud was that the Chrome web browser no longer supports NPAPI plugins because they are outdated and can cause security risks. NPAPI plugins are Silverlight, Java, and Unity, however Flash is a PPAPI plugin and is still compatible with Chrome.
I proceeded to open Wordle in Firefox, and I was successful in creating a word cloud but only after recieving many dialog boxes asking for different permissions.
At this point I would say Wordle is not worth the hassle, and if you were trying to have students use it for a project the issues would probably be far more involved. I feel that if I were a teacher asking students to use this I would waste valuable class time trouble shooting all the problems. I would only have students reference this as an optional resource, possibly giving a chance for bonus points if a word cloud is used. The probable issues that would be encountered and the fact that I find word clouds to not have much purpose makes this tool not worth the time.
Over all the website was easy to navigate, and the word cloud was easy to create. I used the text from a reflection paper I wrote in response to the F. A. T. City Workshop video I watched for my Intro to Exceptionalities course. This is the word cloud I created:

Okay. As I was trying to upload this image, I ran into the issue that the type of file the image is downloaded from Worlde as is not recognized by my computer. I was able to open the file but I had to choose the application I would use to open the file with. I chose windows multi media viewer. I was not able to upload the file to Blogger because the unknown file type was not recognized even though the website says it will be saved as a PNG, so I had to open the image and save a copy of it as a JPEG, and then I was able to upload it to this post.
When I think back to what I learned in this week's lesson, in the TPACK model this application would not be a very fluid way to integrate technology in to teaching methods or a very informational way of presenting content.
Below is the TPACK model I was shown during the lesson.

I would give this application 1/5 stars, and would not recommend it to teachers or students.
Sunday, September 27, 2015
Education of the Future: Openness
Capturing the spirit of open, networked, and participatory communities in our learning environments is something that is rapidly growing around the world today.
OER, or Open Educational Resources, allows for knowledge to be redistributed to others online, where they are able to take the information and remix, revise, reuse, and share it again.
Students are already doing this with their learning, with or without the help of others, but what they could struggle with is separating their personal and professional identities and how much they want to let those two mix together.
Open, in terms of education, is used to mean freely shared. Education is not immune to selfishness, but sharing counter acts this, and benefits not only the students, but other educators as well. Knowledge has the special property where it can be shared from one to another without the person who shares the knowledge loosing anything. This could be really the only thing that doesn't contribute to entropy. When a person shares their knowledge in a tangible form such as a book, there is a limit to how many people can access their information, however when it is shared digitally there is no longer competition for access to that knowledge.
"This advance- to give without giving away- is indescribable." David Wiley
The only adversary to this infinite way to share are policies in place that are put there by outdated thinking that is reinforced by law. You would think with educational resources so available the people with the outdated thinking would be able to teach themselves something new.
With the growing demand for education and the impossibility of creating enough classrooms to satisfy the demand, I see us turning to digital classrooms, where the occupied space would be in the student's head, on their digital device, and possibly in whatever physical form they choose to represent and record their new found knowledge.
If education progresses in this direction, there would be no cost to governments and institutions to give the people what they want, but that also means there wouldn't be any money to be made.
So its hard to say where I see the future of education.
Sunday, September 20, 2015
Sharing Your Work
It is very important that teacher and leaders get in the habit of sharing their work. I mean come on, the president even uses social media! We should all share in whatever format we are most comfortable using, and for those of us who are not very comfortable with social media (like myself) I can direct you to some advice by Dean Shareski.
Social book marking is a good beginner way to start sharing and it feeds into the anonymous voyeurism people are most comfortable engaging with online.
Another great way to begin sharing is with a free BlogSpot blog is what I have recently created and what you are reading this on.
Start small and just lurk for a while, but eventually push yourself to engage by leaving a comment, or sharing a link.
 |
| Found on http://search.creativecommons.org/ |
Creating a new teaching method and sharing it online with everyone benefits the entire community and it also can make you feel like you made a difference, not only in the lives of your students, but the lives of other students whose teachers used your idea. Your district might not even know how much you enrich your school by sharing and incorporating strong communication.
Well how does one decide what to share and what not to share?
I believe you share not
only your best practices and what you are passionate about, but also the successes
of your colleagues and students. We should always be open to input and growth.
A few things you could
ask yourself if you're not sure if you want to share something or not is ask
yourself:
- Is it helpful?
- Is it entertaining?
- And is it something you could show your mother?
Don't just share your work, but share your process.
Traditionally classroom teaching is face to face, which can be effective, but to really make a difference a teacher should push their students to engage with the topic material outside of the classroom. Not with homework, but with communication with peers, parents, family, and even the strangers who follow you. Share your stories and continue to tell them until they resonate with the people around you.
And by sharing what we are learning with the world around us it is important to make sure we present it in such a way that it is easily digestible. An article that is poorly formatted or full of errors will not engage the reader and make the author seem less creditable.
Finally I leave you with this question to help me answer.
- How can we begin to create a culture that encourages transparency?
Subscribe to:
Comments (Atom)